
To save your time for enjoyable gaming, I share here my best tips for Pokémon GO.
For newcomers: I start with a couple of tips for those who struggle with their first day as Pokémon GO trainers. Catch them all!
For advanced players: Thinking of your past weeks, first you checked the Pokémon GO’s tutorial. It did not tell much more than how to catch a Pokémon and that gyms exist. Then you googled for various game evaluators’ articles, reading the same basic hints again and again. Playing the game, you gradually learned many things, the hard way. You might have already learned all the necessary. Still, I hope I succeed in providing some tips that you haven’t seen elsewhere. Share them all!
Terms
All the needed terms are defined at
https://support.Pokémongo.nianticlabs.com/hc/en-us/articles/222049307-Glossary
40 tips to make you a Poké Master
Going closer to a Pokémon – not needed
If you see a Pokémon anywhere on your map, you can catch it from your current location. Do not ever, for any reason, go into a stranger’s garden or backyard to catch a Pokémon that seems to be there. Besides being bad behaviour, there is no need for that.
Do I need to stay at the Pokémon when I try to catch it?
Once you have tapped on a wild Pokémon on the map, its picture opens on your screen so you can throw balls on it. Now you can walk further – to a safer place or into shadow – and the same Pokémon remains catchable in the ball throwing scene.
In other words, you do not need to stop anywhere to catch a Pokémon. Just tap to “move it to your phone screen”, then you can continue your walk and start catching it on your screen with Poké Ballss. Catching Pokémons is not as location-based as you might think on the first sight.
What do the green fluttering leaves indicate?
Occasionally you see green fluttering leaves on the map. There is no Pokémon there. These are hints of possible Pokémon spawn points.
If you hang out in that vicinity for long enough, you have a chance of seeing a Pokémon there. This is just a chance — not a guarantee of a Pokémon appearing. Those leaves also don’t indicate the location of the current Pokémon you’re tracking on the Nearby list.
Do I need to stop at the PokéStop?
PokéStops are identified by a name and a picture of some landmark. From PokéStops you get Poké Ballss, and on higher levels, also other collectable consumables.
You can collect the items from some distance, and you don’t need to stop there. When you think you are close enough, tap the PokéStop symbol to open it. If you were too far, then you get the “PokéStop is too far” message, so you walk a bit closer and try again. When close enough, flick the PokéStop photo to make it spin.
Speeding up item collection
After spinning the PokéStop picture, the collectable Poké Balls show on your screen. The intuitive way to collect them is to tap them one by one. That is not necessary. Just tap the cross to close the screen, and the app will auto-collect everything.
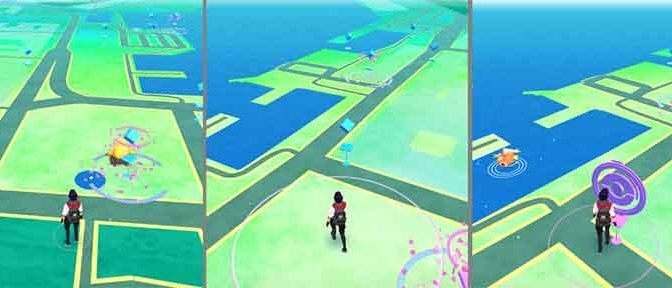
Stay at PokéStops with pink petals
Sometimes your map shows a PokéStop with pink petals falling around. Go there and stay there. Someone has placed a 30 min Lure Module to the PokéStop. During that time there will be many Pokémons. Catch them quickly – these Pokémons also disappear faster than Pokémons elsewhere.
The PokéStop is typically a landmark. Often I see gamers standing as close as possible to the physical landmark when they enjoy the Lure time. That is often not the best place. The effective PokéStop might be a bit elsewhere – the coordinates are often not precisely correct.
Move so that on your screen your virtual me is close to the PokéStop on the virtual map. From there you catch them all.
Turn off AR
When tapping a Pokémon, you enter the AR mode where you see the wild Pokémon against the picture shown by your camera. This is BTW the only AR related thing in this game, despite all the media buzz about AR. And even this VR is valueless from gaming viewpoint. Especially as a novice, you can concentrate better on the catch if you turn the AR off. Then the background picture changes to a landscape drawing. This picture changes from day to night scene, just like the map.

Throwing balls
You have tapped a Pokémon, and now you try to catch it. You are going to swipe your finger to throw the ball… But first wait. Just press press down and hold to take a closer look. The green ring around the Pokémon starts shrinking.
To optimize your throw, try to hit the Pokémon when the circle is smaller. Firstly, you may get a bonus for a good throw, and secondly, this decreases the risk that the Pokémon would flee out of your Poké Ball after a successful catch.
Catching a Pokémon gives you regularly 100 XP. In addition, you can get bonus for a “Nice” (10 XP), “Great” (50 XP) or “Excellent” (100 XP) throw.
As a rare surprise, you can get a 100 XP bonus on every 100th catch of a specific type of Pokemon.
Some articles advise you to throw when the circle is smaller, some others tell you should throw when the circle is larger. Originally, both seemed to be right. If the colored circle was smaller, the Pokemon Go sets it easier to catch the Pokemon. If you flicked your Pokeball when the circle is larger, you were more likely to get an XP bonus.
Currently (in v 0.33) the consensus opinion is that one should try to hit the Pokémon when the circle is smallest. You then might get also the Nice, Great and Excellent bonuses. However, provenly, you sometimes get those bonuses also when the circle is big. And very often, you don’t get any bonus even when you hit the smallest possible circle perfectly. I’m sure the Niantic programmers are working hard on this. The bonuses for Nice, Great and Excellent disappeared fully in version 0.31 and came back in version 0.33 update.
Curved ball
Combined with a successful catch, you may earn 10 XP for a “Curved Ball.”
 Many articles advice that “you can get more experience from catching a Pokémon by spinning the ball first“. There are countless YouTube videos showing concretely how you first spin the ball and then throw it.
Spinning the ball with your finger creates a nice visual effect. The ball starts sparkling.
However, to get the Curved Ball Bonus you don’t need to spin the ball at all – that’s just a myth. It is enough that your fingertip draws a curved line on the screen when you throw the ball.
Circle colours
The circle on the wild Pokémon is not always green. For some Pokémons, it is yellow, and for some others red.
From many Pokémon Go articles, you might learn that “green means easy to catch, yellow is harder and red hardest.” That’s not the whole truth. There are also orange circles. That’s an intermediate level. Or actually a range of intermediate levels. All the shades from yellow through orange to red are in use. The closer to red, the more difficult.
In practice, you do not need to care about the color when you throw the ball – you catch all of them in the same way. However, a Pokémon having a non-green circle may easily flee after the catch. Then you just have to throw the ball again. And sometimes it flees again, and then you throw again. The likelyhood of fleeing is affected by both the Pokémons CP (the higher, the more often it flees) and your own level (the lower, the more often…).
For difficult-to-catch Pokémons use better tools
From level 8 upwards, facing a difficult-to-catch Pokémon (high CP, orange or red circle), you can give it a Razz Berry to make it your friend before you throw your Poké Ball.
From level 12, you’ll start getting also Great Balls. They have a better catch rate than the standard Poké Ball.
At level 20, you’ll unlock Ultra Balls that are even more effective.
You missed it – can you still get the ball back? (No)
The Poké Balls are perhaps the most critical resource you have. Often you miss the throw.
Good news: Some people tell about a secret trick: There is a moment when the missing ball rolls on the ground. If you now tap on that Poké Balls, and if the app registers your attempt, the ball may return to your inventory. This works often but not always. Make it a habit to tap the rolling ball, and you’ll save dozens of balls.
Bad news: The trick does not recover the Poke Ball. Every time you throw a Poke Ball, it is subtracted from your inventory and you will not get it back. Visually, it may look like you get the ball back. However, tapping a Poké Ball just despawns a new Ball and allows the next throw to happen quicker.
Should you really catch them all?
The most common advice given in Pokémon Go articles is that there are no worthless Pokémons in Pokémon Go. They advice you to catch each and every Pokémon you see.
The streets and parks seem to be full of Raticates, Weedles and Pidgeys. Why are they all worth a catch?
Firstly, you can change the lower-CP individuals to candies. To do that, tap the Pokémon in the list, then open the menu in the lower right corner and tap the “Transfer”.
Secondly, you may want to save a larger number of duplicates in order to evolve them all, just to get XP. This you should do first when you decide to use your Lucky Egg, as the Lucky Egg doubles those XPs.
So, there are good arguments for catching them all. However, there are also cases where trying to catch a Pokémon is not wise. Every now and then you find a truly uncatchable Pokémon.
Firstly, you may experience e.g. a bug that lets you throw perfect throws but then nothing happens – you just lose the ball. Naturally, then you should stop trying and just close the app.
Secondly, sometimes you encounter a high-CP Pokémon that is too hard for your level. You give it Razz Berries and you throw perfect throws but the Pokémon flees away every time you catch it. Finally, it runs away. Was it then worth throwing away all your Poké Balls or Great Balls? Surely not.
And thirdly, on higher levels, the most common Pokémons might really no more add value to your collection. At some phase, you have an army of Pidgeottos and a handful of Pidgeots. (For newcomers: Pidgeys evolve first to Pidgeottos and then further to Pidgeots). You have more than enough of Pidgey candies. Being short of Pokéballs, Is it then still worth to try to catch every new Pidgey on the street, and thereby run out of balls? No. Better save your remaining balls for something that adds value.
Don’t evolve them all – yet
In the beginning you will catch Pokémons that are in the start of their evolution paths. By using candies you can turn these into more evolved ones.
Later you are likely to also find wild Pokémons that have already evolved further on the same evolution path. Then you might regret that you wasted your early candies for evolving something, and now you could use the same candies for powering up this more evolved creature.
The same matters to power-ups. In the beginning you may waste a lot of Stardust to evolve e.g. a Pidgeotto (second stage of Pidgey) from 100 XP to 200 XP. This costly power-upped Pidgeotto will eventually become worthless when a few days later you just pick up powerful Pidgeots (third stage of Pidgey) of 300-500 XP from the street.
And when you get to level 9, you will have a new reason to regret that you evolved things too early. From level 9 onwards, you will get Lucky Eggs. Lucky eggs double all your XPs during 30 minutes. When evolving something, you would thus get 2×500 XP = 1000 XP.
Over your first days (or weeks) of playing, you are likely to collect a large number of Pidgeys, Weedles and Rattatas, and each of them has a relatively low cost to evolve. When the moment of using your Lucky Egg comes, evolve them all to Pidgeottos, Kakunas and Raticates. You then get 1000 XP for each evolvement. Naturally you also need to have collected the corresponding amount of candies for this moment.
I waited until level 15, then I evolved dozens of Pidgeys, Weedles and Rattatas. This way I jumped five levels up, i.e. to level 20.
Don’t be too sparing with your potions and other collectibles
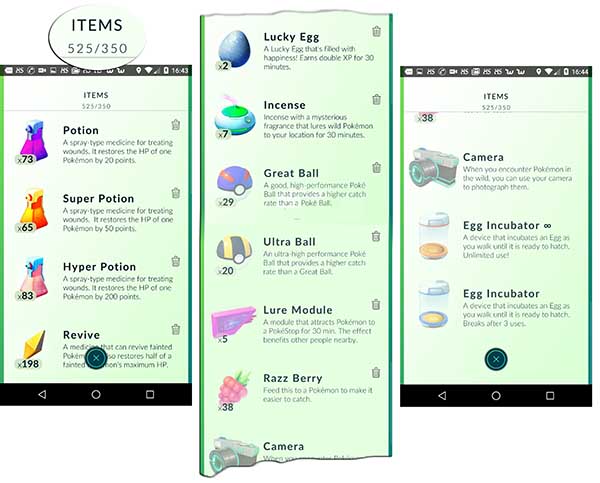
In the beginning you may feel that saving all the goodies for some later use is wise. Well, this is what happens: Sooner or later, the app will tell: “Your bag is full.” Usually this happens after a level-up, when the app had just donated you a larger number of items.
When your bag is full, you can’t collect any new Poké Balls (nor anything else) from the PokéStops.
So keep an eye on the item count, and consume the Potions, Revives and Incentives before they fill your bag. Plan B is to throw some of the Potions and Revives to trash.
Good news: After a level-up, when the app donates you a larger number of items, they will magically fit into your bag even if this puts the item count over the current max.
Here’s how my bag looked like when I had just evolved rapidly from level 15 to 20. There were 525 items in a standard 350 item bag.
Tracker position
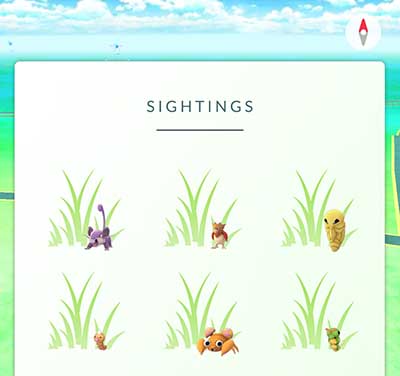
There is a Pokémon tracker in the lower right hand corner of the screen. In its different versions, it has led to different types of confusions.
Intuitively many gamers thought that the grid’s directions (top, left, right, bottom) would map to real directions. That was a wrong guess. This Tracker grid ordered the nearby Pokémons from left-to-right: The closest creature would thus appear in the upper left corner of the grid. However, if there was only one Pokémon in the tracker, then it showed in the middle of the top row.
In v. 0.33, the Tracker’s title was changed to “Sightings”. In earlier versions, the title was “Nearby”.
Tracker footprint
Until v. 0.30 – and possibly again in the future when bugs have been fixed – there were footprints beneath each Pokémon in the Tracker. Pokémons with three footprints are far away. With two footprints they are closer. With one footprint even closer. And without a footprint you are standing next to the Pokémon, and it should be on your map.
The tracker distance indicators worked only in some very early software versions. After the official launch, they stopped working. All the Pokémons on the tracker always had three footprints, and none of them reduced to two footprints, no matter how far you walked into any direction.
In addition, when moving around, next to you, i.e. on the map, you will see Pokémons that you never had in your Tracker. Moving further, they disappear, and they are still not on the Tracker. The Tracker is a fun thing, but it has showed mostly disinformation.
Forbes had a good Tracker article in which the editor described his studies and tests about how the Tracker worked.
Good news: The Tracker footprints were removed in version 0.31.0, so they are no more confusing you.
If the Tracker comes back again…
Let’s assume that the Tracker would work after some SW update. Then this one is a handy feature:
Tap a Pokémon in the Tracker grid. Now the grid closes and you see just that single tracked Pokémon on the lower right corner above your map. And then, if the footprints were working, you could see how far this single catch is from you.
Moreover, you could now use your compass (the icon in the upper right) andslowly turn yourself around. The lower-right tab will begin to pulse green when you’re facing the direction of the Pokemon you’re tracking.
From where do you get XP
In Pokémon Go, it is crucial to get experience. Only by collecting XP you advance to new possibilities: higher levels which open the chances to find better Pokémons.
Capturing, evolving, and hatching Pokémons are among the best ways to earn XP, aside from winning gym battles. The list below shows all the different sources of XP.
For example, if you capture your very first Magicarp with a Curve Ball, you get 100 XP for the Capture, 10 XP for the Curve Ball, and 500 XP for the new Pokémon, i.e. 610 XP with one throw.

XP from New Pokémons
- 500 XP – Capture a New Pokémon
- 500 XP – Evolve a Pokémon
- 1000 XP – Hatch a 10 km Pokémon
- 500 XP – Hatch a 5 km Pokémon
- 200 XP – Hatch a 2 km Pokémon
- 100 XP – Capture a Pokémon by a Throw
- 10 XP – Curve Ball
- 10 XP – Nice Throw
- 50 XP – Great Throw
- 100 XP – Excellent Throw.
XP from Gyms
- 150 XP – Defeat a Pokémon Trainer at Gym
- 100 XP – Battling a Pokémon Trainer at Gym
- 50 XP – Beat a Pokémon in Training at a Gym
XP from PokéStops
- 50 XP – Checking in at a Pokéstop (even if your bag is full, so you don’t get any collectibles from there)
And during the Lucky Egg‘s 30 min, all of the above would double.
Walk – or ride a bike
Hatching eggs is done by walking. Driving in a car or train won’t count – except if your speed is below a limit. So, if you play Pokémon on the back seat, you may ask the driver to drive on slower roads.The official sources say it is 18 km/h but the personal experiences tell that also somewhat faster speeds work fine. Why?
Many gamers have noticed that even they have been running around for hundreds of meters, the app does sometimes not count any of them. Why?
Both whys have the same answer. Every 60 seconds the game checks how far you’ve gone from your starting point (i.e. the last time it scanned) to the point you’re at now. It then calculates a straight line path between those two points and finds the distance. If that distance within those 60 seconds is greater than 300 meters, the distance doesn’t count. And if you have run 100 meters in one direction and then back, the distance counts as zero.
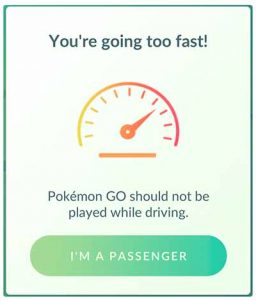
Consequently, also speeds above 18 km/h may count when you don’t move on a straight line.
In v 0.33, they added a warning that should appear when you move too fast. I got this warning when I had been sitting comfortably on my couch for the past hour. It is in practice a sign of a varying GPS signal, so the app thinks you are moving. Consequently, you typically get this warning when you are inside a building.
Save the breaking Incubators for 5 km and 10 km eggs
In the beginning, you get one Incubator where you can hatch eggs infinitely. Later, you get Incubators that break after three usages. You better save the breaking ones for those eggs that require 5 km or 10 km walks. Use the infinite Incubator for 2 km and 5 km eggs.
From longer-distance eggs you get rarer Pokémons. Also your own level affects: On higher levels you get better Pokémons from the same egg. Experts – wiser than me – recommend that you should hatch the first 10 km eggs first when you are above level 15-20. There you start to get value for your steps.

Use Incense – and keep on moving
Use Incense to attract Pokémons to you. If you stay still, you’ll see one Pokemon every five minutes. If you take a walk, you’ll lure one Pokemon every 200 meters, i.e. about once a minute.
Change your location in large scales
Certain Pokemon types are found only in certain locations. And vice versa, if you stay only at one location, you’ll only see a limited range of Pokémons.
Keep the app on
Don’t let your phone go to sleep mode when you are moving. If the app is not open and active, it will not count your steps. Neither will the game alert you when a Pokémon or a PokéStop is near.
There is only one thing that goes on when the app is not active. If you have paid for some time-limited consumable like Incense, its timer will keep on counting down.
The app eats your batteries empty pretty fast. Using your phone’s own sleep timeout can’t be used as then the app would no more be active. Instead, use the Battery Save option of Pokémon Go’s own settings. Having that on, turn the phone’s upper end to point at the ground. Now the the app is active although the screen has gone black (It does not go totally black: some OS level symbols may stay lit in the header or footer area).
Buy at least one extra battery
If you plan to play the game at all, do buy an extra battery. Without it, you won’t have much playing time (or walking time). A 2000-2600 mAh power bank costs no more than 10 euros.
Set Google Maps offline
Pokémon Go uses Google Maps. Go to Maps’ Settings, and put it into offline mode. Then the Google does not update the Maps continuously on the background but uses your offline copies of the maps. But remember to put it every now and then back to online – recommending at least once a week.
Choose the team wisely
On level 5 you can enter Gym battles. Then you are first asked to join a team: Mystic, Valor or Instinct. If you play alone, it doesn’t matter, in which team you are. However, to use the combined power – and feel the joy – of team work, join the same team with your friends or family members with whom you visit the Gyms. On the other hand, playing against the majority may add some extra interest in the game.
The popularity percentages of the different teams do not vary much globally. 40-45% of the people choose Mystic. 30-35% choose Valor and 20-25% Instict.

Attack both friendly and unfriendly Gyms

If the Gym is held by your own team, your task is to strengthen the Gym by (friendly) attacks. When you beat your own team’s Pokémons, you earn not just XP for yourself but also more Prestige for the Gym. The higher the Prestige, the more Pokémons you can place in the Gym, and the more difficult it will be for other teams to take over this Gym.
If the Gym is held by some other team, your task is to weaken the Gym by repetitive attacks. When you beat the Gym’s defending Pokémon, you reduce the Gym’s Prestige. Beating all the defending opponents in a gym battle session will reduce the gym’s prestige by 2000 points. When a gym’s prestige reaches zero, you can claim the gym and take control of it for your team.
For a battle, you best team up with a few players of the same team – then you get down the Prestige quickly.
Do not think of winning – or losing – a Gym as a single battle. Capturing a Gym requires a longer chain of several battles.
Be fast when you claim the gym
When you have succeeded in reducing a Gym’s Prestige to zero, its color turns to grey. You still have NOT taken over the Gym. You have to claim it for yourself. The needed action is to place one of your own Pokémons in the empty Gym.
Especially novice players often need a few seconds to figure out how this happens, and during that time someone else takes over the Gym. I’ve seen this happening several times, on different Gyms.
First you need to tap the button in the lower left corner.

Then you select one of your strongest Pokémons to become the new defender. This Pokémon must have full 100% health, e.g. 83/84 HP would not be enough.
In practice, you should keep one To-be-the-defender Pokémon ready in full health. In other words, don’t use that Pokémon in the last battle in which you drop the Gym’s Prestige to zero.
After you have won the Gym, continue attacking it to strengthen it
Once the Gym is yours, i.e. your Pokémon is defending the Gym, now both you and your team friends should start attacking the Gym to raise its Prestige as high as possible.
The difference is that now you can use only one Pokémon for the attack, whereas for the unfriendly attacks you could use six Pokémons.
Collect the Poké Coins
Once you have a Pokémon stationed at a Gym, you can earn Pokecoins. You must specifically ask the app to give you the the Defender Bonus. If you forget that, you will get nothing.
The “Defender Bonus” button is not easy to notice – especially if you don’t know that you should be looking for it. When the Gym is yours, first find your way to the App’s internal Shop, and there in the upper right corner you see the Shield symbol. Tap it to claim the rewards. You can press that button once every 21 hours.
You can control up to 10 Gyms at a time, meaning you can earn up to an additional 100 Pokécoins each day.
If you plan to take over several Gyms, you must collect all of their rewards simultaneously. That is, you collect al the Gym rewards only once every 21 hours.
If your Gym is taken over by some other team before you claim for its Defender Bonus, you don’t get anything.
If you can keep the Gym for more than a day, you earn more. However, it seems to be very rare that anyone holds a Gym for more than a few hours.
Don’t be afraid of losing the Gym battles. That’s your chance to consume those Potions and Revives that you might have all too many in your bag.
Use also the first Battle second effectively
For basic attacks, just keep on tapping the screen. You may start tapping already before the GO text disappears. This way you use also the first second of the battle effectively.
Alternatively, if you swipe left or right to dodge at the beginning of a battle, you might often give yourself an extra attack or two before your opponent can catch up your direction.
Learn to use the Special Attack
Each Pokémon has two types of attacks: the basic attack and the special attack which is more powerful.
Special attacks are available when the blue box has filled up. Then you hold down the finger, and release it when the thin blue bar has filled up.
When the opponent Pokémon is about to use its special attack, you may notice a yellow flash. Then dodge, i.e. swipe left or right to move your own Pokémon, and it won’t take the big damage.
The opponent Pokémon has been placed there by some other human player but once it is on a Gym, it is guided automatically by the server’s machine logic. Its logic does not know how to dodge – so that gives you a strong advantage. You can avoid the opponent’s special attacks, but it can’t avoid yours.
Choose the attacking Pokémon based on the defenders
Before attacking a gym, check the types of the defending Pokémons. If there’s e.g. a Ponyta, you’ll find – using your own Pokédex or just Google – that it belongs to Fire Pokémons. Now look at your own possible attacking Pokémons: Do you have strong Pokémons with Water attacks? They cause double damage against Fire Pokémons.
Correspondingly, if you choose poorly, your attack power may be cut to half of the normal. For example, Ice Attacks are weak against Fire type Pokémons.
Note that the Pokémon Type and the Attack Type are two different issues. The Basic Attack and the Special Attack may have different types too.
This table may help you in selecting the most effective attackers.
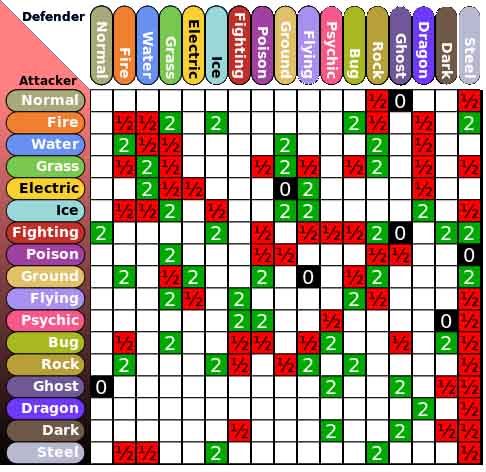
In other words, if you face a Normal Pokémon, you should use Fighting attacks.
Against these Pokémon types, use these attack types
- Normal: Fighting
- Fire: Water, Ground, Rock
- Water: Electric, Grass
- Electric: Ground
- Grass: Fire, Ice, Poison, Flying, Bug
- Ice: Fire, Fighting, Rock, Steel
- Fighting: Flying, Psychic, Fairy
- Poison: Ground, Psychic
- Ground: Water, Grass, Ice
- Flying: Electric, Ice, Rock
- Psychic: Bug, Ghost
- Bug: Fire, Flying, Rock
- Rock: Water, Grass, Fighting, Ground, Steel
- Ghost: Ghost
- Dragon: Ice, Dragon, Fairy
- Dark: Fighting, Bug
- Steel: Fire, Fighting, Ground
- Fairy: Poison, Steel
For deeper understanding read e.g. https://rankedboost.com/pokemon-go/type-chart/
Add diversity to friendly Gyms
When you add a Pokémon to an already-friendly gym, you better vary up which type of Pokémon you’re adding. If the Gym includes Pokémons of only one type, e.g. an all-Fire gym of Flareons and Vulpixes, it is vulnerable to Water and Ground-type attacks.
Use nicknames to highlight the differences of similar Pokémons
In a Pokémon’s information, its name (the title) gets editable by clicking the pen icon. Create a naming system to differentiate your favourite Pokémons that look the same but have different attacks.
For example, I have two strong Fearows. The first one’s basic attack is Steel and its special attack is Flying. I have renamed it to “Frw Ste+Fly”. Another Fearow has Flying and Ground attacks. It I have renamed to “Frw Fly+Gro”. This way I can quickly pick up the needed attackers for a battle.
Get used to bugs
Bad news: Whatever games you have played before, I bet you never experienced any so popular software that has so many bugs. The app freezing can happen in almost any possible situation – whether you do something or you don’t. If playing a buggy game sounds frustrating, don’t even open this app.
However, if take the bugs as part of the game, the following tips may help you sometimes.
Good news: From version to version, the freezing bugs seem to get less frequent.
CP Curve
What does the CP curve mean, and how should one use it? You use it for deciding which Pokémons to evolve. The curve is a relative meter showing your Pokémon’s strength as an (invisible) percentage of its highest possible strength.
The mental models of different experts seem to vary a lot. In one article, the analyst advises to evolve only Pokémons whose CP curve is only at its beginning at the left, so they still have growth potential after evolving them. Another analyst advises to evolve only those whose CP curve is close to its end at the right, so the high percentage of the maximum CP is utilised also on the higher evolution level. And the third ones advise you pick up the highest absolute CP values within each species, and evolve them, regardless of the curve position.
Don’t worry, there is a truth out there. This article explains the idea of CP curves pretty well: http://imgur.com/gallery/iQNiY#nsWnFB8
For power gamers: Ingress
Ingress was the previous game made by Niantic. Pokémon Go’s PokéStops used to be Ingress’ Portals. The map of Ingress shows the nearest PokéStops (or Portals) in a clearer way than Pokémon Go does.
So, download and install Ingress to be even more effective in Pokémon Go.
Keep on being unsure
Having so many different interpretations of how the game might work all reflects one obvious root cause: The interaction design is still on prototyping level, and the information visualisation has not succeeded to communicate the interaction designers’ mental models clearly enough. Users now just have to make guesses of the possible game rules.
The golden hints
Reading advices from many experience gamers, I have noticed these repeating themes:
- Avoid using the Stardust in the beginning – save it for higher levels where the evolutions and powerups have much more value.
- Do not waste Lucky Eggs. Save the Pidgeys, Weedles and Rattatas and evolve tons of them when you are e.g. on level 15.
Easter egg #1 – pick up the Pikachu
Pikachu is “The” character of the Pokémon. In Pokémon Go it is told be a rare creature, and therefore valued by the players. It is not especially powerful.
Right at the beginning of the game you see three Pokémons on your map: Charmander, Bulbasaur and Squirtle. It is obvious that you should pick one of them. But you don’t have to – the fourth alternative is to take a Pikachu. Here’s how:
Just (physically) run away from the three offered Pokémons. After you have escaped from them, the game throws the three to you again. And again. And on the fourth time, you will find a Pikachu on the map.
I’ve seen some experts suggesting that if you miss this chance, then after this you can find a Pikachu only on higher levels. So why did I find a Pikachu on the second day of playing Pokémon Go? I don’t know. That Pikachu waited for me next to a nearby school, and I picked it up.
The learnings: Pokémon Go is not a game that you win by following some clear rules. Instead, Pokémon Go is a good reason to go out and see what happens.
Easter egg #2 – Eevee evolution
Eevee has several possible evolutions: Flareon, Jolteon, and Vaporeon. By default, the evolution is chosen randomly. However, if you nickname your Eevee in the right way, then it will evolve into your desired evolution.
Want a Flareon (fire type)? Then name it Pyro.
Want a Jolteon (electric type)? Name it Sparky.
Vaporeon (water type)? Name it Rainer.
Umbreon (dark type)? Tamao.
Espeon (psychic type)? Sakura.
This easter egg trick is reported to work only once – after that the evolution is as random as usual.
Did anything remain unclear?
In July-August 2016, just about every newspaper editor wrote an article about Pokémon Go. PC Mag (of UK) published their “20 hidden tips for Pokemon Go Fanatics“. Forbes article lists”10 things I wish I knew when I started Pokémon Go“. Techradar has a guide for absolute beginners. And so on.
They seem to generally repeat the same basic ideas. This one went deeper, thus I recommend it:
I appreciate also you sharing any new tricks that I haven’t mentioned above. I’ll gladly re-share your links.